💡 Info: This article assumes you have intermediate knowledge of Linux/Bash shell and Python.
If you use the Windows operating system, please check out a guide on how to set up WSL2. This will not work otherwise!
macOS users I am sorry, the part about systemd is not relevant, but you can follow along with the Python code.
What is a venv?
Python virtual environments (venv) are isolated environments where you can install packages without affecting other projects.
This allows you to have different versions of packages for different projects, without them interfering with each other.
✏️ In a nutshell it bundles all your program libraries in a folder.
Why use it from a script?
Let's say you are building an API. If you are not using a container or a deterministic system, you might want to avoid using packages that could be outdated from your system's Python.
A way to do this is by using a requirements.txt file, in combination with venvs, which lets you choose specific versions of the packages you need.
To help integrate this api with the system, you might want to use a systemd service file.
How ?
First, go to your project folder. I'll assume your virtual environment is in a folder called .venv.
Now create a file called run.sh and open it in your favorite text editor:
export PATH="$(pwd)/.venv/bin:$PATH"

python main.py
This will activate the venv and run the main.py script.
Hope you find this information useful! 🙌
Bonus: Let's create a simple API and make systemd start it
We are gonna make heavy usage of the command line, I assume you are prepared for this! 🪄
Make a folder for your project:
mkdir simple-apiOpen the folder in your favorite code editor, and launch a terminal from it.
Let's get a venv
python3 -m venv .venv
source .venv/bin/activate
Add flask, the library we are gonna use to build this API
pip install flaskWe will also add gunicorn a production-ready appserver
pip install gunicornCreate a lockfile
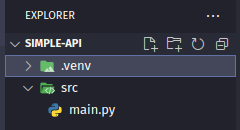
pip freeze > requirements.txtCreate a src folder and your initial main.py file
mkdir src
touch src/main.py
This is how the folder structure should look like:
Let's start coding:
from os import getenv
from flask import Flask, jsonify
from random import choice

app = Flask(__name__)

greetings = ["Hello", "Hola", "Bonjour", "Hallo", "こんにちは", "Hei", "Привіт"]

@app.route(f'/')
def index():
    return jsonify({'msg': choice(greetings)})

if __name__ == '__main__':
    app.run(host=getenv('HOST') or '127.0.0.1', port=getenv('PORT') or '5000')
Now, I will explain the code:
The imports are self-explanatory:
- Flask for listening to requests and replying to them
getenvfor reading the environment variables (that we later are gonna use for the port and the host)choicefor choosing a random greeting from our list
This line initializes the library
app = Flask(__name__)Here we store multiple ways to say hello:
greetings = ["Hello", "Hola", "Bonjour", "Hallo", "こんにちは", "Hei", "Привіт"]This code says, hey: the following function is an GET route for the endpoint /
@app.route(f'/')
def index():
Here we first choose a random item from our greeting list, then store it in a dictionary, and lastly return it as a JSON text.
Wow, that was a lot in just one line of code!
return jsonify({'msg': choice(greetings)})Lastly, we run the API so we can listen to requests.
The if statement checks if we are running the script directly, it is needed for using production app servers like gunicorn.
The next line grabs the environment variables and provides some defaults to them.
Then we launch our program! 🚀
    if __name__ == '__main__':
        app.run(host=getenv('HOST') or '::', port=getenv('PORT') or '5000')
Let's test it!
python main.pyLet's call it! Use another terminal
curl http://localhost:5000/You should see this:
{ "msg": "Hello" }✨ It works! Nice
Let's configure systemd
For this I am gonna use
systemduser services, if your server/VPSruns as root, you might want to consider creating a user for your projects.If you wanna proceed using default services, you can do so, just remove the
--userflag from all the commands from here.
To make our program start automatically with the system we need to create a system-d unit.
But first, let's make a bash script for starting our API:
touch launch.shInfo: We are creating this file outside of the src directory.
export PATH="$(pwd)/.venv/bin:$PATH"

python -m gunicorn --chdir src main:app -w 4 --threads 2 -b [::]:5000
I will explain what happens in this script:
First, we set up the PATH variable so we can run Python from our venv, then the gunicorn module is executed, and this will launch the appserver.
The arguments make sure to change to the src directory and run on 4 workers with 2 threads each.
It also tells it to bind on all addresses, by using [::] on the port 5000
You can test this by running the script.
Before this, close your existing terminal if it already has a venv activated
chmod +x launch.sh && \
./launch.sh
When you finish testing it, please close it by pressing Ctrl+C
Let's set up the service unit:
mkdir -p ~/.config/systemd/user
cd ~/.config/systemd/user
touch simple-api.service
Open the file simple-api.service with your text/code editor:
[Unit]
Description=My flask API

[Service]
WorkingDirectory=/home/user/simple-api
ExecStart=bash launch.sh

[Install]
WantedBy=default.target
✅ You need to replace
/home/user/simple-apiwith your project path.
Enable the unit:
systemctl --user daemon-reload
systemctl --user enable --now simple-api.service
Recommended for server/VPS (not your dev machine):
sudo loginctl enable-linger $(whoami)This will make it so all your user's services will start even when you haven't logged in.
Let's try to call it!
curl http://localhost:5000/{ "msg": "Bonjour" }Hope you enjoyed this article! Have a wonderful day! ☺️
Reverting changes
Important if you don't want this api taking the port
5000forever!
Disable the service unit:
systemctl disable --user simple-api.serviceRemove it:
rm ~/.config/systemd/user/simple-api.serviceDelete the simple-api folder.
rm -rf simple-apiConclusion
You have successfully created a Python API using Flask and Gunicorn.
You can now use this API to build your own projects, or use it as a starting point for your own API.
👋 Take care & happy coding!